Last updated
How to edit content pages in Console
Learn how to use Pages to edit content across Landing page, informational pages, or blog pages.
Table of Contents
- Introduction
- Gettings started
- Sections, Blocks, Fields, and templates
- SEO and social media metadata
- How to add Sections
- Define the Section ID
- Select the Section template
- Add title and/or description (Optional)
- Add call to action content (Optional)
- Specify Section appearance
- Add content Blocks (Optional)
- Adding media to a Block
- Format with markdown
- Sections without blocks
- Edit Sections
- Reorder Sections and Blocks
- Remove Sections or Blocks
- Can I edit the Footer or the Top bar?
- Publish your Page changes to Live
This guide introduces how to use Pages. Pages lets you edit your marketplace’s content pages, like your Landing page or About page. If you would like more background on the Pages feature, consult this Introduction to Pages article.
Introduction
Gettings started
Find the Pages feature in Console. Navigate to your Test environment, pick the “Build” section from your top bar, select “Content” from the sub-menu, then select “Pages” from the left side menu. You should now see your default content pages (the About page, the Landing page, the Terms of use page, and the Policy page) ready for editing. You can also access the feature directly through the path https://flex-console.sharetribe.com/content/pages. Make sure that you are in the Test environment of your marketplace if you want to start modifying your Pages right away.
If you don't have the default Pages available in Console and want to start trying out this feature, check out our article about enabling the Pages feature in your marketplace.
Sections, Blocks, Fields, and templates
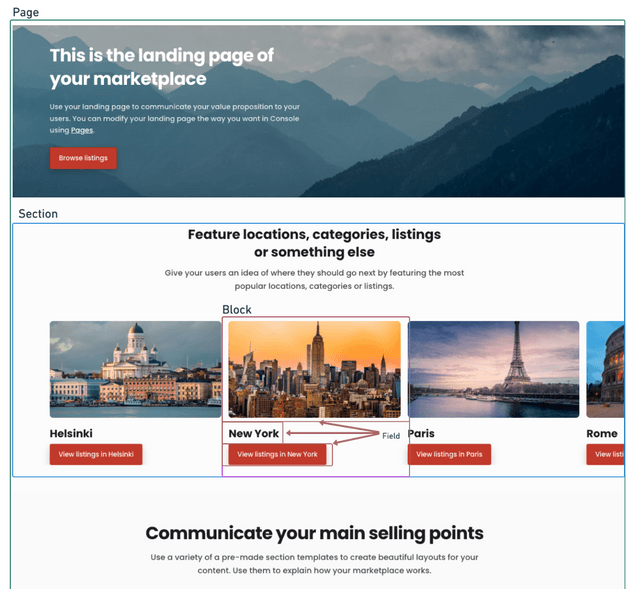
Content pages in your marketplace are built using Sections, Blocks, and Fields. Section templates determine layout and content type per Section.
Any Page, including your Landing page, consists of a set of Sections. A Section is a part of the page that takes full page width and can hold content inside it. Each Section can have a title, a description, a call to action, and a number of Content Blocks. Section Template determines the layout of the Content Blocks. Every Section in a content page is created and managed independently from other Sections.
The basic content of the Section is stored using fields. Examples of Section fields include title, description, call to action content, and appearance.
Each Section can also contain any number of Blocks. Blocks normally contain more detailed information for a Section. Each Block is made up of different fields like media, titles, text, and call to action.
The default landing page in a Flex marketplace Test environment has different type of Sections that will help you get an idea of what is possible with Pages.
The rest of the article explains the steps to work and edit Pages in general, which can be used when modify an existing page or when creating an entirely new page from scratch.
SEO and social media metadata
Every page has metadata, also called, meta tags, that determines how search engines and social media platforms will display it. Google, for example, uses the title and description you set to your page to populate their search results page. You can read more and learn how to edit your SEO and social media metadata in this article.
How to add Sections
These are the typical steps to create a new Section:
- Define the Section ID
- Select the Section template
- Define number of columns (for carousel and column templates only)
- Add title and/or description (optional)
- Add call-to-action content (optional)
- Specify background and text color
- Add Blocks to a Section (optional)
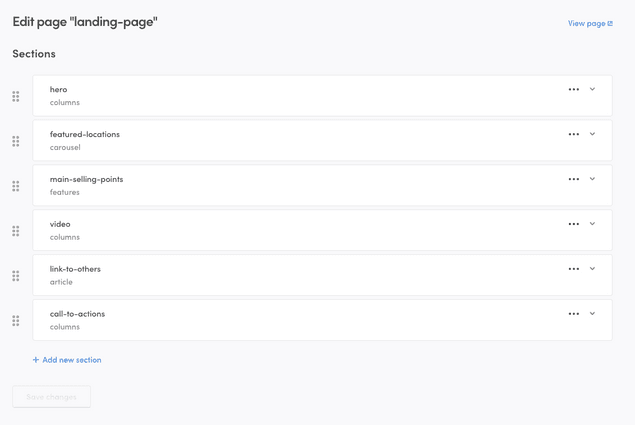
To add a Section, click on the “+ Add a new Section” link.
Define the Section ID
When creating a new Section you need to define the section-id, or the name of the Section. It must be unique and should be descriptive. The clearer you make it, the easier it will be to identify this Section later on and edit the Page in the future.
Important: if you don’t select an identifier, you will not be able to save your Page.
Select the Section template
The Section template determines how Blocks are laid out in your Section. There are four possible layouts:
- Article: Narrow one column layout optimized for reading
- Carousel: Displays content in blocks that can be scrolled through horizontally.
- Columns: Display content blocks in 1,2,3 or 4 column grid
- Features: Text and media are displayed side by side in alternating order
You can see examples of each Section template in our Section templates article
Tip: The template can be modified later on, so don’t worry too much about it when testing,
Important: if you don’t select a Section template, you will not be able to save your landing page.
Add title and/or description (Optional)
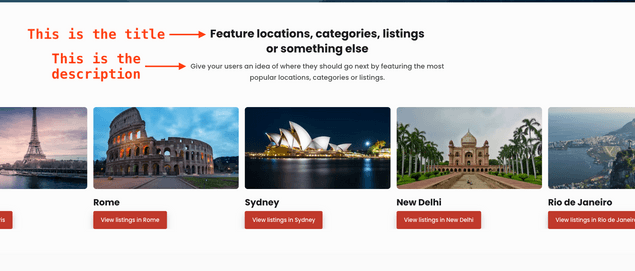
You can add the title and description you want your users to see. The title will be displayed in bigger font at the top of the Section. How big is determined by your title header level. H1 is bigger than H2. The title size also determines the HTML level header indexed by search engines. You can use the title to explain the content of the Section or define a larger text that you want to highlight.
Tip: For SEO reasons, every page should only have a single H1 title.
The description refers to the subtitle of the Section. It can be used as a short or long description for the Section. These texts are optional.
Add call to action content (Optional)
The call-to-action content is basically a button in your Section. The button can help you guide your users to specific actions that you want them to take. That is why it is named call to action. You can define the type of call to action, the text and the specific link.
- Call to action type: No call to action, internal link or external
link. This determines the default behaviour and validation for the
button.
- No call to action means that there will be no general button for this Section. You can always add buttons via call to action settings withing blocks
- Internal link means that the link will open in the same tab. The link should point to another page within your marketplace. You should only include the path after your main marketplace URL.
- External link means that the link will open in a new tab. The link should point to a location outside your marketplace. You need to specify the complete URL.
- Link text: The text within the call to action button. Try to make the text short and simple to engage your visitors and incite them to action.
- Link address: The URL or folder for the button.
- Internal link: you have to specify a path within your
marketplace. For example “/p/about”, it will take your users to
https://yourmarketplaceurl.com/p/about - External link: you have to specify a complete URL. You need to add http:// or https:// to your link.
- Internal link: you have to specify a path within your
marketplace. For example “/p/about”, it will take your users to
Adding a call to action to your Section is optional.
Specify Section appearance
You can choose between Default or Custom.
Default
The default background is white or shaded white. The color alternates within each Section to make a slight yet almost imperceptible difference between them. Between rgb(252,252,252) and rgb(250,250,250)
Custom
With custom appearance, you can specify any other background color with the color picker or add a background image to a Section. The image will always be set on top of the background color. Unless your image is transparent, it will cover the background color. Your image will be expanded to fit the dimensions of the Section. You can also define the text color. The options are black and white. The background and the theme affect the whole Section, including all the blocks contained in it.
Add content Blocks (Optional)
Every Section can be expanded by adding Blocks. You can add Blocks by clicking on the “+ Add new Block…” link at the bottom of the Section.
Each Block needs to contain a unique Block ID. All the other fields to create a block are optional, however, they are recommended.
- Block ID: a unique identifier for each Block within the Section. Similar to the Section id. Without this ID, you cannot save changes to your Page.
- Media: choose if your block features an image, YouTube video embed, or no media.
- Text content: Title content, title size and text content. These are comparable to the text content features for the main Section.
- Button content: Button type, button text and button link. These are comparable to the button content features for the main Section.
The blocks are the soul of each Section. Without block content, each Section will be indistinguishable from the others. Once you add blocks, each one will be displayed and ordered according to the type of Section. There is no limit to the number of blocks that you can add.
You can even have Sections that don’t contain the basic information in the Section fields, and add only information within blocks.
Adding media to a Block
You can add an image or embed a YouTube video as part of the content of every Block, within your pages. Depending on the Section template that you choose the image or video will be displayed in a predetermined layout.
- Image: If you want to add an image, you need to upload the image file from your device. You also need to specify the aspect ratio of the image. The options are: Square, Portrait, Landscape and Original. You also have to define the image alt text.
- Video: If you want to add a video you need to specify the Youtube video ID (which can be found in the URL of the video or within the stats of the video). You also need to specify the Aspect ratio. The options are: Square, Portrait, Landscape and Original
Format with markdown
You can use markdown to format text in your Fields within Blocks. To learn more about the markdown supported by Pages visit our article about supported markdown.
Sections without blocks
Blocks are optional. You can use any Section without using blocks. You can use the basic fields to create Sections for displaying images, titles, pieces of information or just call to action buttons.
example sections without blocks 1/3


Edit Sections
At any point you can edit your default pages by modifying the content within the default pages' Sections. Press on the Section ID to start editing it. In order to save any changes you need to click the “Save changes” button at the bottom of the page. We recommend editing one Section at a time, to make it easy to identify errors of missing fields that would prevent you from saving changes. Bear in mind that the "Save changes" button only gets enabled when there are changes to be saved. I.e. if you don’t make changes, or you make changes and then remove the changes the save button will be disabled.
As soon as you save the changes of the page, you can click the link to visit the page to check the new changes or, if you already have the page open somewhere, reload the page to see the changes. In the Test environment, the changes will be reflected immediately. In the Live environment, it will take 5 minutes to see the changes reflected. This is due to the page’s cache.
Reorder Sections and Blocks
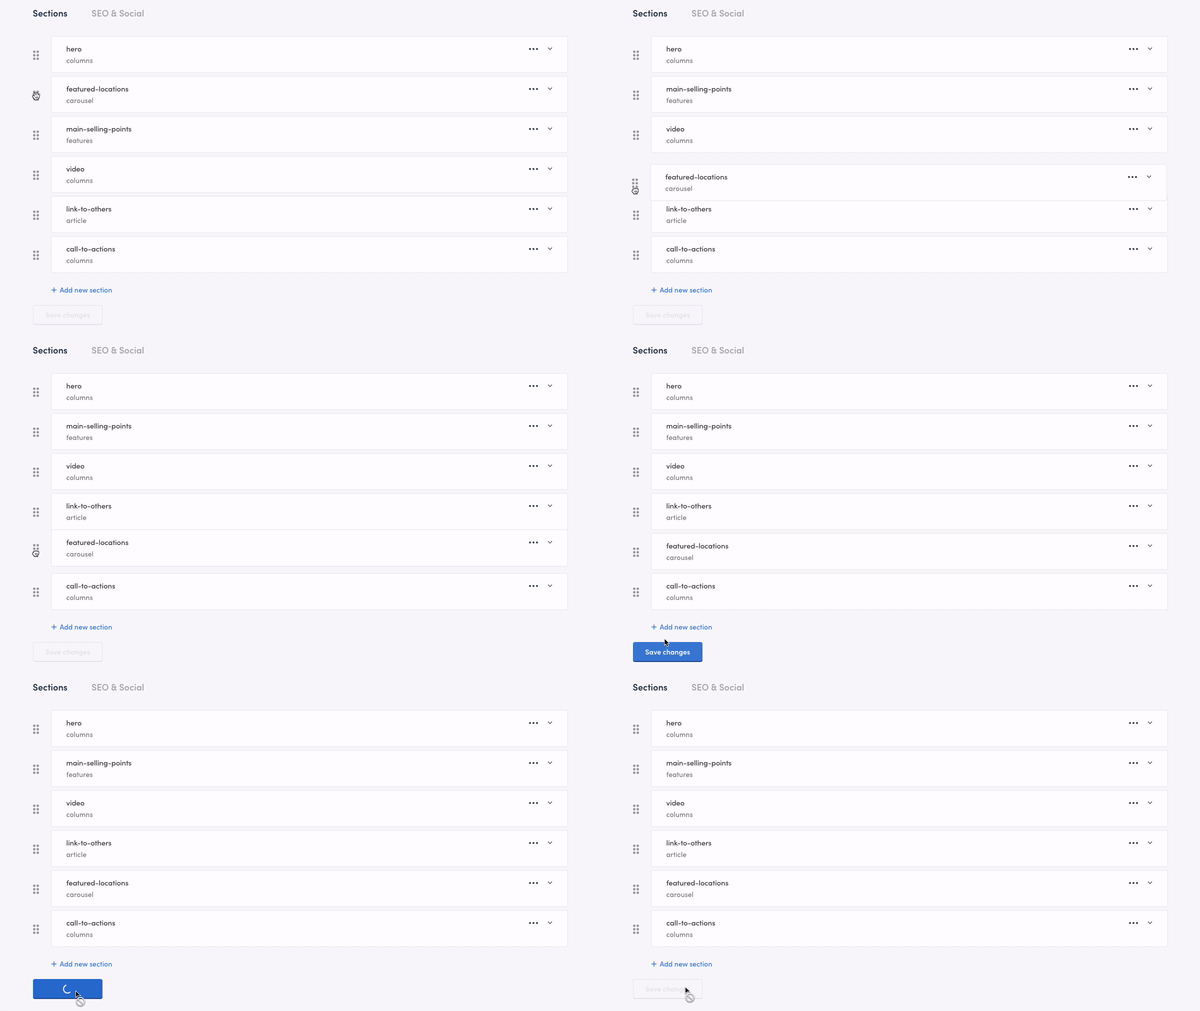
You can alter the order of the Sections within the Page or the Blocks within a Section by dragging and dropping the elements. Make sure to save your changes after altering the Section content or changing the order of the elements, otherwise they won’t take effect on your live Page.
Remove Sections or Blocks
At any point you can remove your Page's Sections and blocks by clicking on the three-dot menu on the top right corner of the Section card. Bear in mind that even though the action is technically irreversible, you still need to save the changes for them to take effect in your environment. If you don’t save your changes the delete action will not be completed.
Can I edit the Footer or the Top bar?
The footer or Top bar cannot be edited using Pages. Changing their content requires changing your marketplace code directly. Contact your developer if you need help with changes or follow our developer documentation to learn more about editing the code of content pages.
Publish your Page changes to Live
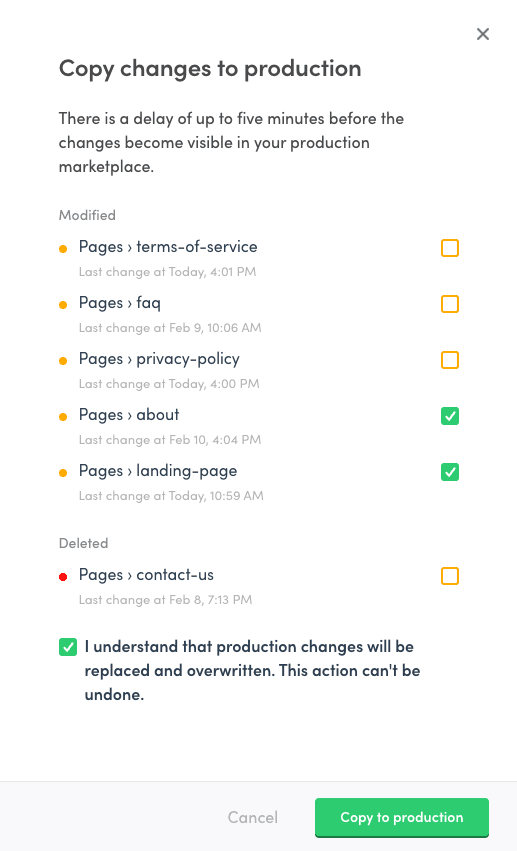
To see your changes in your Live marketplace, you must copy the changes you made in your Test environment to your Live environment.
Click the “Copy to live…” button and then select the specific pages that you want to copy. This will transfer all the content from the Test environment to your Live environment.
The changes that you make to Live will be available a few minutes after copying them to Live. You do not need to save them again in your Live environment.
