Last updated
Default transaction process options
Illustrated guide of the options buyers and sellers have with the default transaction process.
Table of Contents
- Calendar booking
- 1. Booking a listing as a buyer
- 2. Approving or rejecting the request as a seller
- 3. Holding the payment (escrow) and payout to the seller
- Operator actions
- Buying and selling products
- 1. Purchasing a product as a buyer
- 2. Processing the purchase as a seller
- 3. Holding the payment (escrow) and payout to the seller
- Operator actions
- Free messaging
- 1. Inquiring about a listing as a buyer
- 2. Reacting to inquiries as a seller
- Operator actions
A transaction process charts the available actions a provider, customer, and operator can take during a transaction. There are three different transaction processes available by default: Calendar booking; Buying and selling products; and Free messaging. You can learn more about how to select a transaction process while creating a Listing type in this article.
The rest of this article shows how the different transaction processes look and work for customers, providers, and operators in your marketplace and Console.
Calendar booking
1. Booking a listing as a buyer
This process should be used when a transaction involves a customer booking a time from the provider's availility calendar. Default booking units are hourly, daily, or nightly. To learn more about how availability management works with different booking units, please see this article.
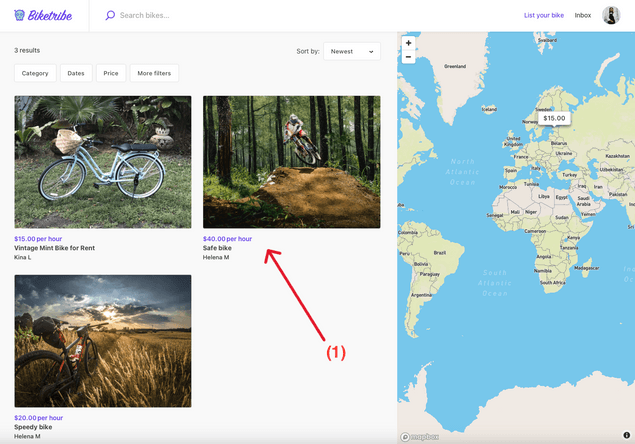
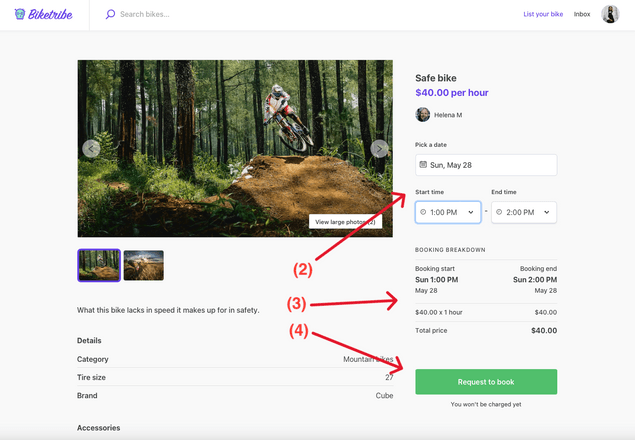
To make a booking, the user will (1) browse the listings and click on the desired item or service. Then, they will (2) select their preferred booking duration from the provided calendar, and see the price (3) for booking the listing for those days. Once selected, they proceed by clicking on (4) "Request to book".
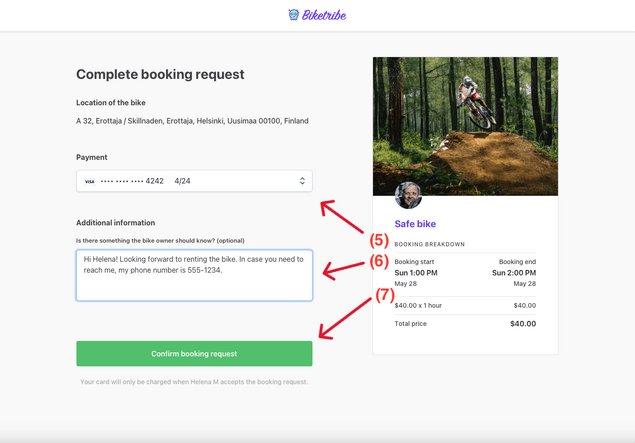
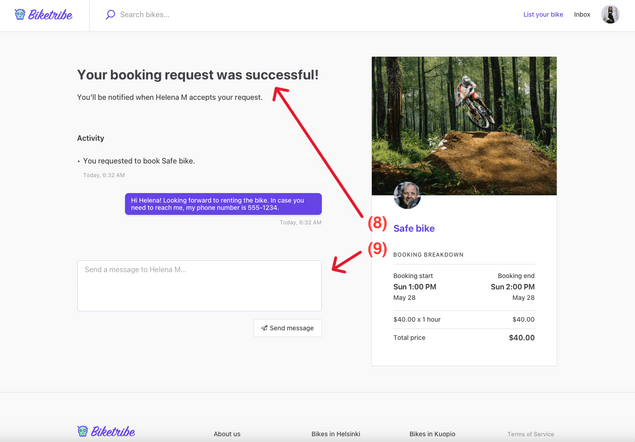
The user is then taken to a separate booking page, where they are able to choose their payment method (5) and add additional information regarding the booking as a message (6). They also see the total price of the booking. When they are ready, they will click on “Confirm booking request” (7). They then get to the final page, where the booking request is confirmed (8), and there’s the option to send further messages if needed (9).
You can see screenshots of the different steps below.
2. Approving or rejecting the request as a seller
Once a booking request is made, the seller has the authority to approve or reject the request. Sellers receive a notification for each booking request both via email as well as on the marketplace as a notification, and can review it before deciding. If the seller doesn't respond within the specified timeframe, the booking request will expire automatically. This ensures that buyers aren't left hanging and can quickly seek out alternatives.
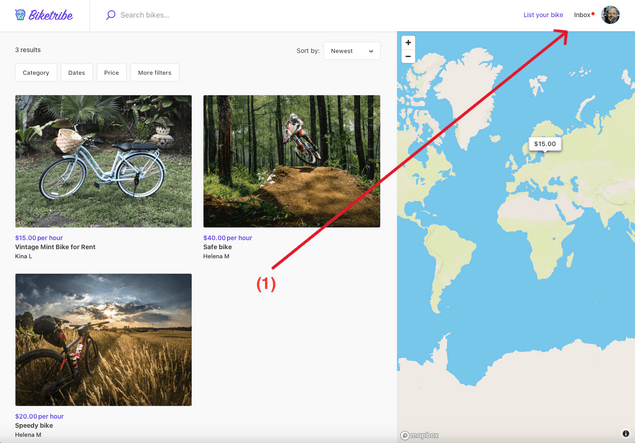
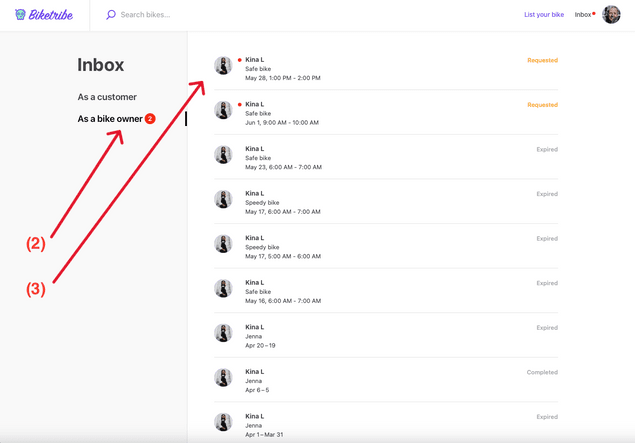
When a seller receives a booking, they will get an email notification and see a red notification on their marketplace interface near the inbox button (1). Within the inbox, they have the option of seeing all the bookings and booking requests in the seller inbox (2). They can access the newest request by clicking on it (3).
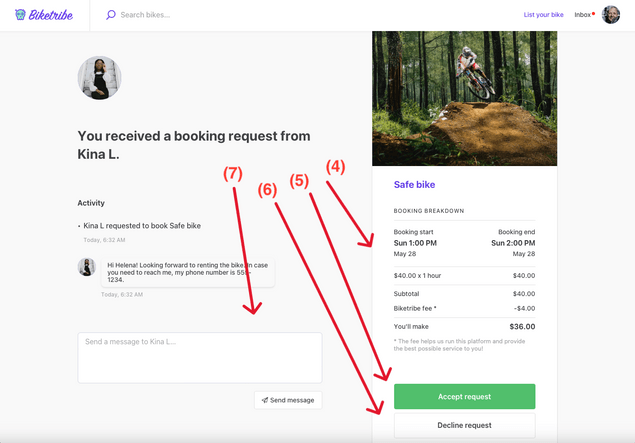
This takes them to the same kind of booking page as the buyer. Here they can also see the price breakdown including the marketplace fee (4), and either accept (5) or decline (6) the request. The seller can also send a message (7) to the buyer before or after accepting/rejecting the request.
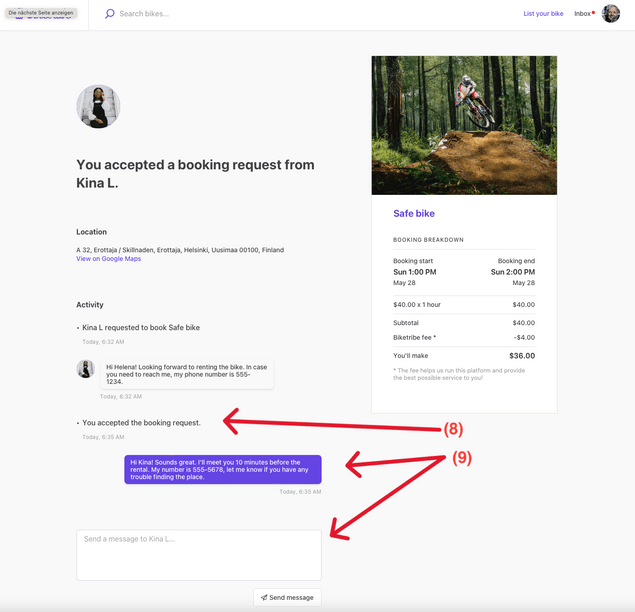
When accepting or declining the request, the conversation thread is updated (8). Both the seller and the buyer can still exchange messages in the conversation thread (9).
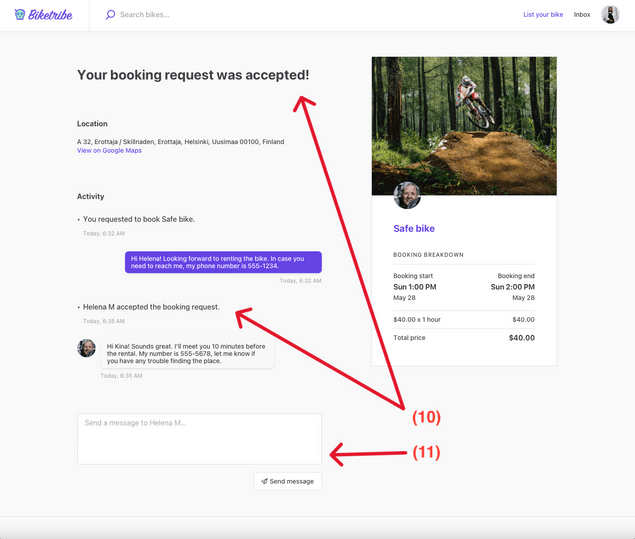
On the buyer’s side, they will be able to see that the booking request has been accepted(10), and continue sending messages if needed (11).
You can see the screenshots of these steps below.
3. Holding the payment (escrow) and payout to the seller
Sharetribe provides a secure system for payments. When a booking is made, the payment is held in escrow until the service or item is delivered. After the delivery, and the confirmation from the buyer, the payment is released to the seller. This creates trust and assurance between parties involved in the transaction.
The default transaction process captures the funds immediately from the buyer’s credit card when they are making the booking request. The reservation is then converted to a charge once the seller accepts the request. The funds are then held by Stripe until the booking period has passed, and the buyer has confirmed that the booking passed as expected. After this, the funds are released to the seller, who will receive the payment within 1-2 weeks.
Operator actions
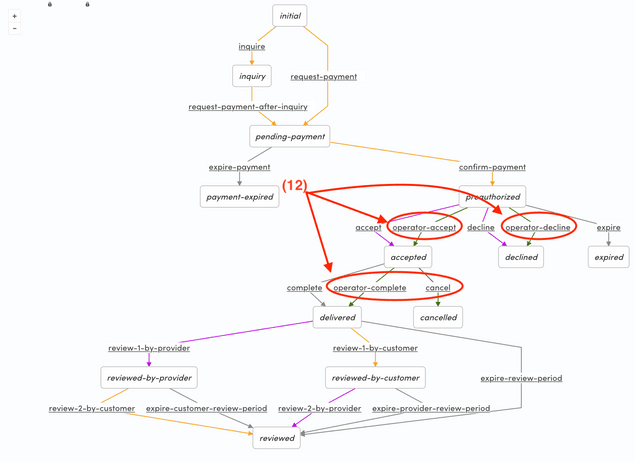
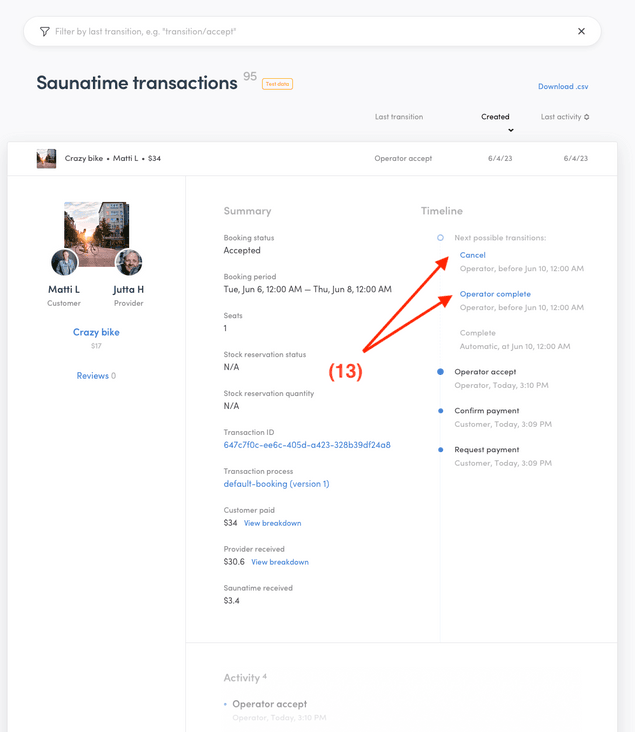
Sharetribe allows you to act on behalf of your users if needed. In the default booking transaction process, there are four options: accepting or declining a purchase request, and marking it as completed or cancelled on the user’s behalf (12). Cancelling the transaction includes refunding the Stripe payment.
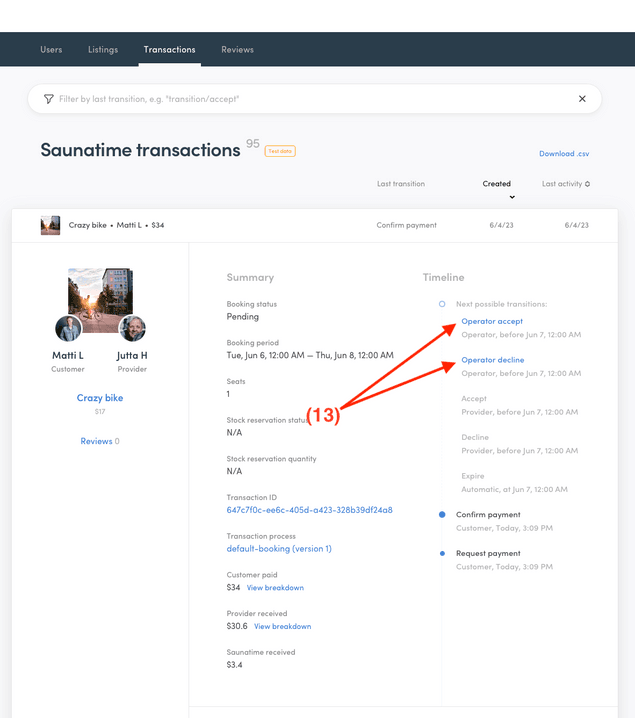
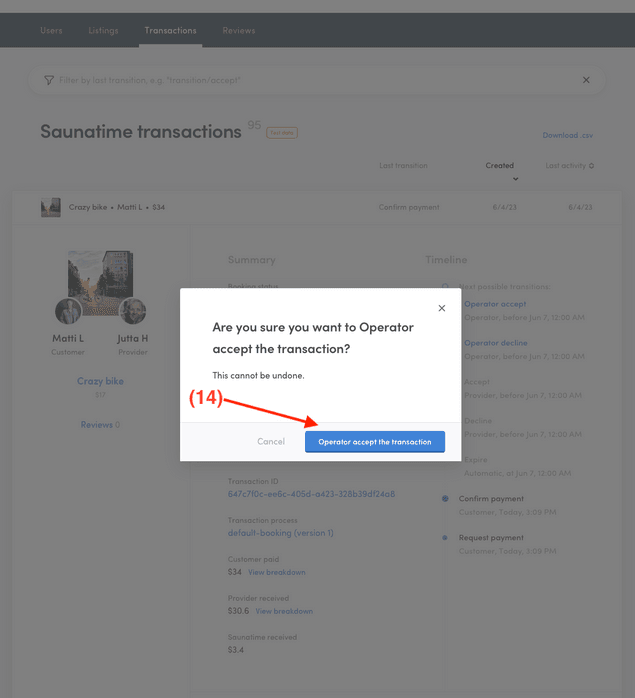
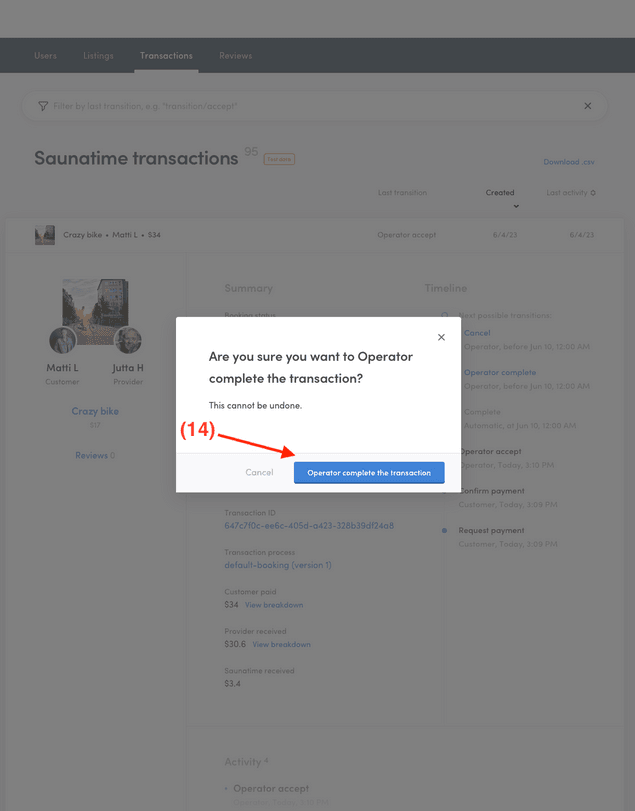
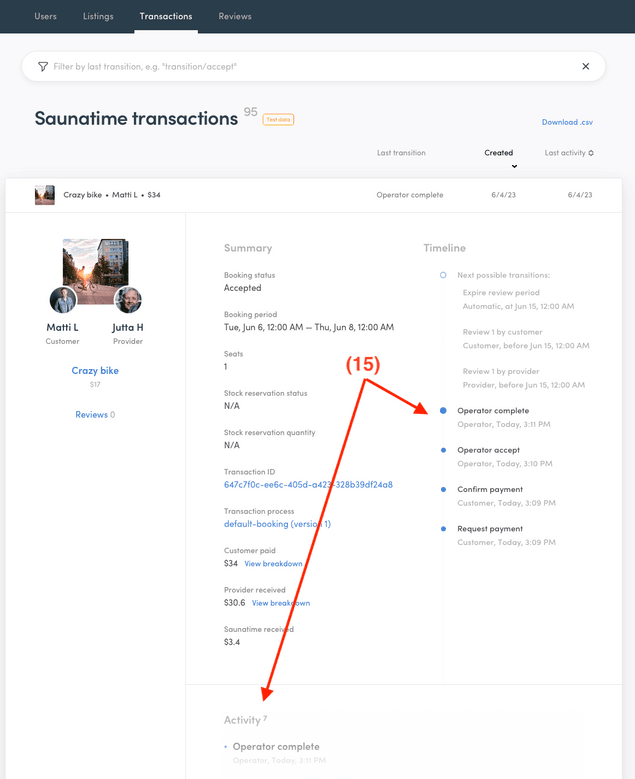
These actions are taken from the Console. You need to navigate to the transaction in question, and then choose the action from the right hand side (13). The transaction needs to be in the appropriate stage for these options to become available, and you need to confirm the action you are taking through a separate window (14). Whenever you move the transaction forward, you can see confirmation that the operation was successful from the timeline and activity logs (15).
You can see screenshots of the process below.
Buying and selling products
1. Purchasing a product as a buyer
This process is suitable for product marketplaces. It is possible to make purchases of different types and quantities, such as an order of one or more t-shirts, or digital files. In the example below, which is a bike selling marketplace, we assume that the users are already logged in.
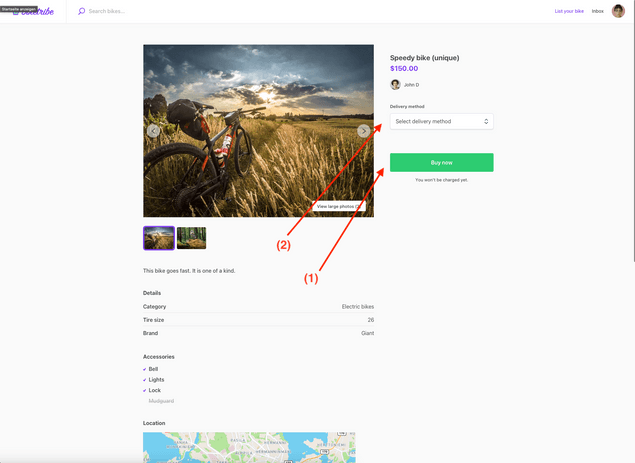
In cases where there's only one item in stock, a buyer can purchase it instantly by clicking the "Buy Now" button (1). If the item only has one delivery method, that one is chosen by default. Otherwise, users can use a drop-down selector to choose between pickup and shipping (2). When the buyer has chosen their delivery method and clicked on the buy now button, they proceed to checkout.
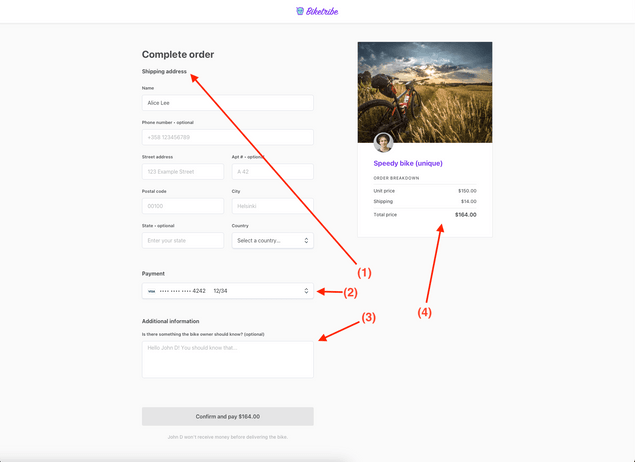
The checkout process looks different depending on the delivery method. If shipping was chosen, the users will see a screen where they can select their shipping address (1), payment method (2), send additional information as a message (3), and see the price breakdown with the shipping cost included (4).
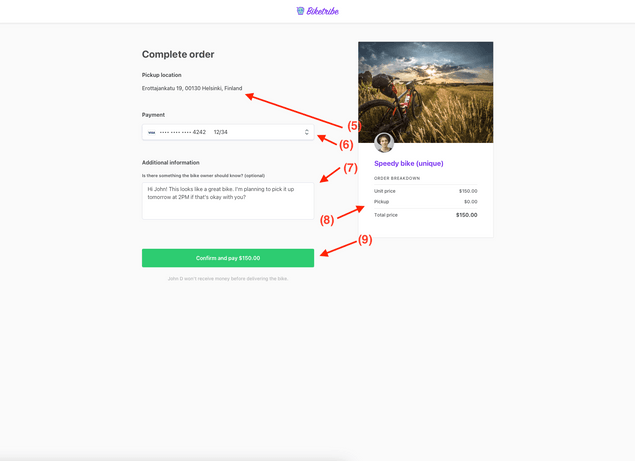
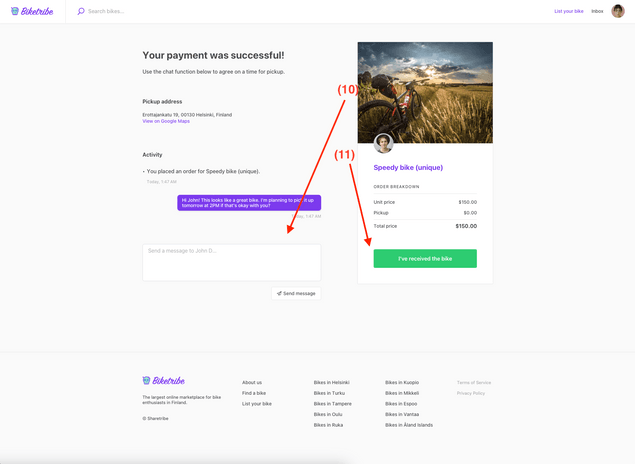
When using the pickup delivery method, the checkout screen is a bit different. Here, the user will see the pickup address (5), payment method selection (6), the option to add additional information as a message (7), and the price breakdown (8). Here, we use the pickup delivery method so we click on “Confirm and pay” button (9). After this, we see the order details page where further messages can be exchanged (10) and we get the option to mark the bike as received (11).
The pricing of a single item stock is determined by the seller and displayed on the listing page. A shipping fee is added to the price if one is specified by the seller. With both pickup and shipping, buyers can review the price on both the purchase and checkout screens before deciding to make a purchase.
With a stock quantity of 1 in a listing, once the item has been purchased, the listing automatically closes to prevent additional purchases. This ensures that there are no over-sales.
You can see screenshots of the different steps below.
2. Processing the purchase as a seller
Once a purchase is made, sellers receive a notification both via email as well as on the marketplace as a notification. They can review the details and prepare the product for shipment, delivery, or pickup as needed.
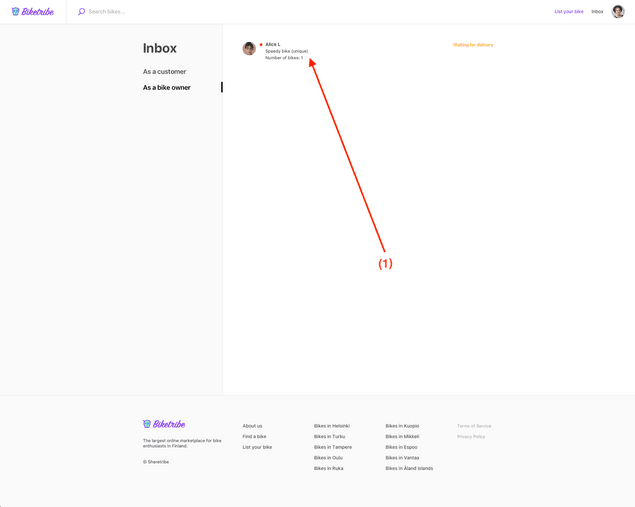
Within the inbox, sellers have the option of seeing all the purchases in the seller inbox. They can access the newest purchase by clicking on it (1).
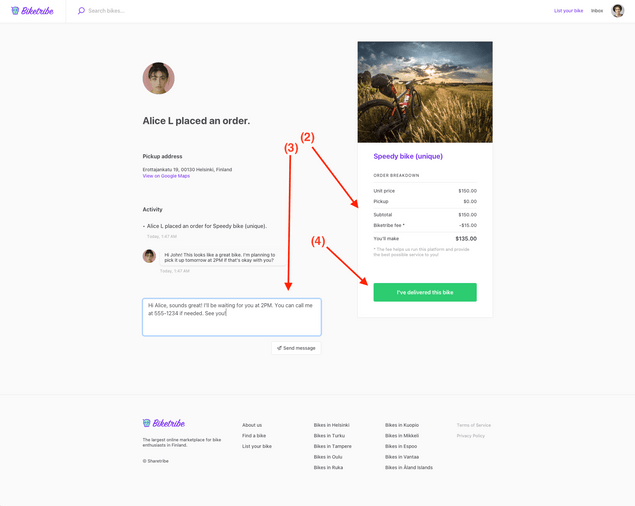
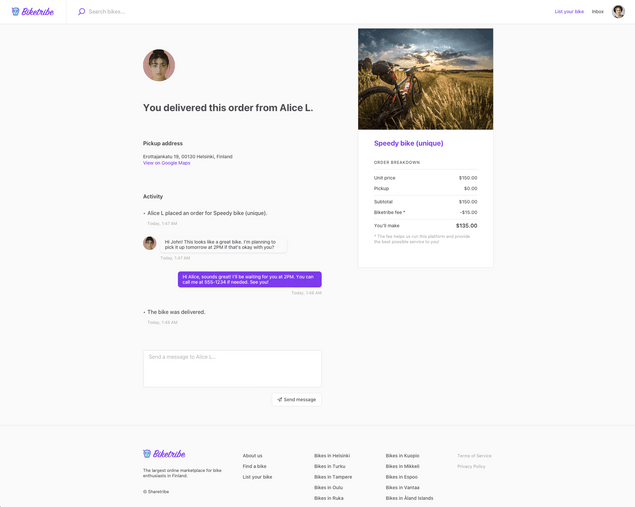
This takes them to the seller's order details page. Here they can also see the price breakdown including the marketplace fee (2) as well as shipping details, if applicable. The seller can also send a message (3) to the buyer and mark the bike as delivered (4). After selling the listing, the seller sees a confirmation page (5).
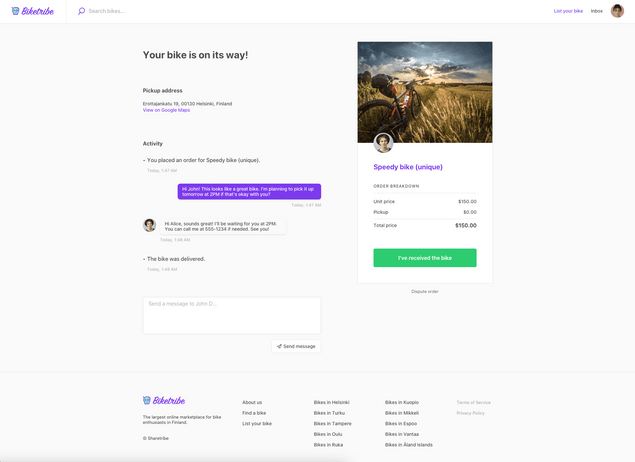
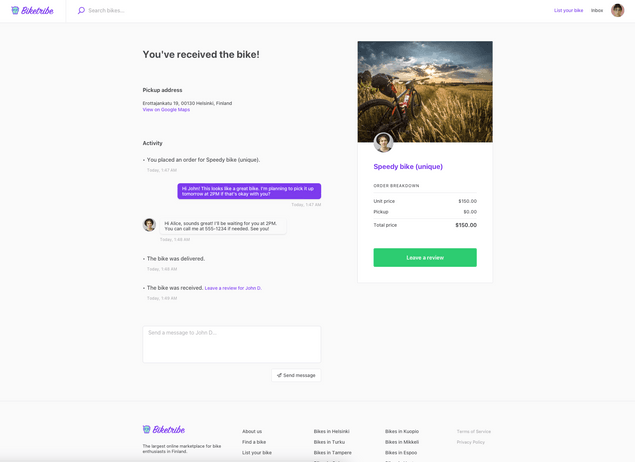
On the buyer’s side, they will be able to see that the purchase has been accepted, continue sending messages if needed and mark the bike as delivered (6). After the buyer has marked the listing as received, both parties can write reviews (7).
You can see the screenshots of these steps below.
3. Holding the payment (escrow) and payout to the seller
Sharetribe provides a secure system for payments. When a purchase is made, the payment is held in escrow until the buyer marks the transaction as completed. After the buyer does this, the payment is released to the seller. This creates trust and assurance between parties involved in the transaction.
The default purchase process creates a charge on the buyer’s credit card immediately when the buyer places the order. The seller then needs to mark the order as delivered once they’ve shipped the order or the buyer has picked it up. It’s also possible for the marketplace operator to mark an order as delivered in Console on behalf of the seller. If nobody marks the order as delivered, the order will be automatically cancelled after 14 days and the buyer will be refunded.
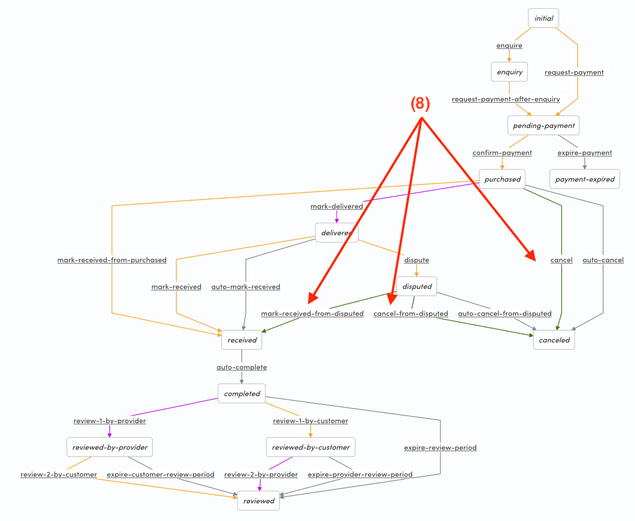
Once an order is marked delivered, the funds will be released to the seller when one of these two conditions is met: 1) The buyer marks the order as received or 2) Two weeks have passed from marking the order as delivered and the buyer hasn’t disputed the order. If the buyer disputes the order before 2 weeks have passed, then it’s up for the marketplace operator to decide how to resolve the dispute: the operator can either refund the buyer or release the payment to the seller. If the operator doesn’t take an action within 60 days, the order will be automatically cancelled and the buyer will be refunded.
Operator actions
Sharetribe allows you to act on behalf of your users if needed. In the default product purchase transaction process, there are three options (8): cancelling a transaction after it has been purchased; and either cancelling the transaction or marking it as received after a dispute has occurred. Cancelling the transaction includes refunding the Stripe payment in both cases.
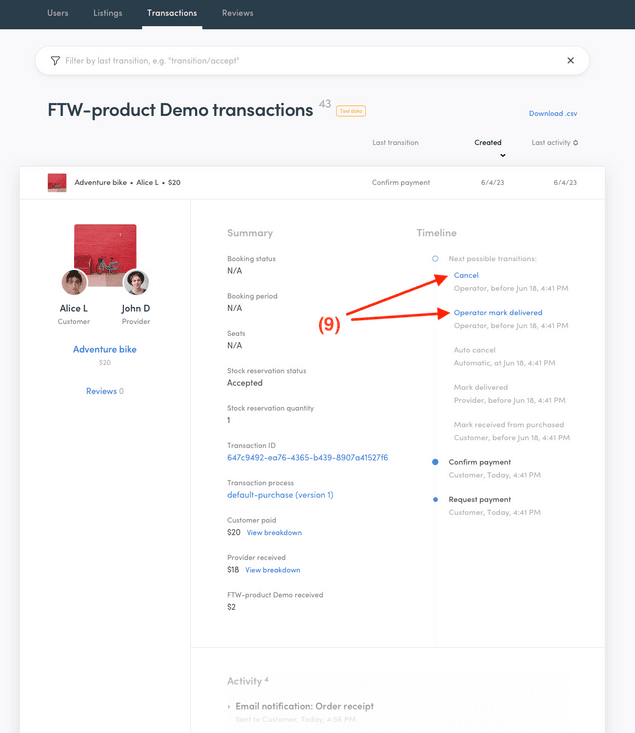
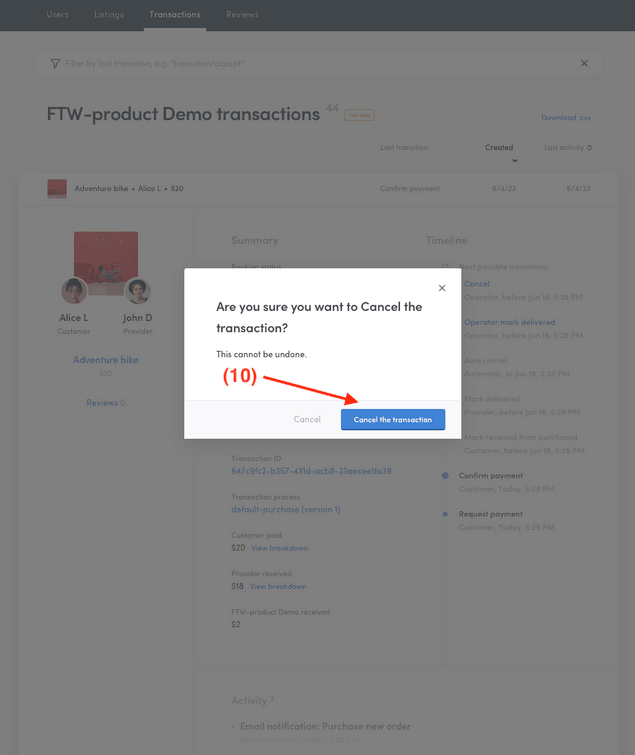
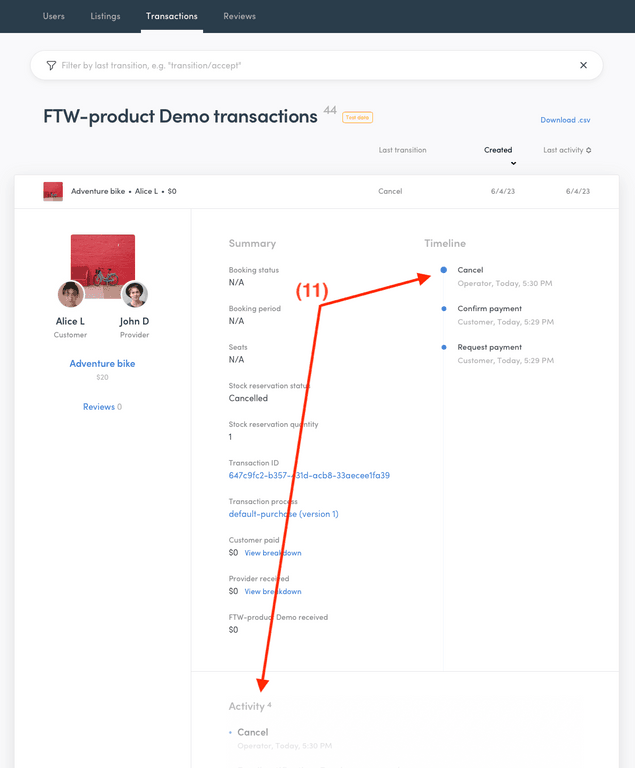
These actions are taken from the Console. You need to navigate to the transaction in question, and then choose the action from the right hand side (9). The transaction needs to be in the appropriate stage for these options to become available, and you need to confirm the action you are taking through a separate window (10). Whenever you move the transaction forward, you can see confirmation that the operation was successful from the timeline and activity logs (11).
You can see screenshots of the process below.
Free messaging
1. Inquiring about a listing as a buyer
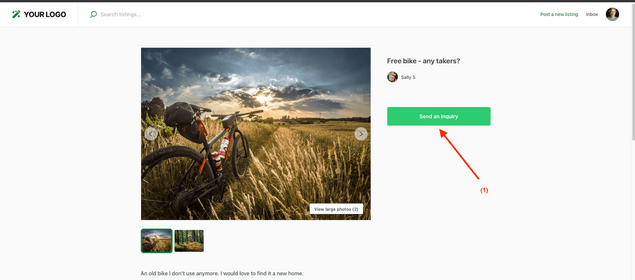
Free messaging should be used when no payments happens on the platform during a transaction. The process is simple: buyers send an inquiry to the provider to start a transaction. Providers can respond to the inquiry on the order details page with a message. The buyer and seller can message as much or as little as needed through your marketplace.
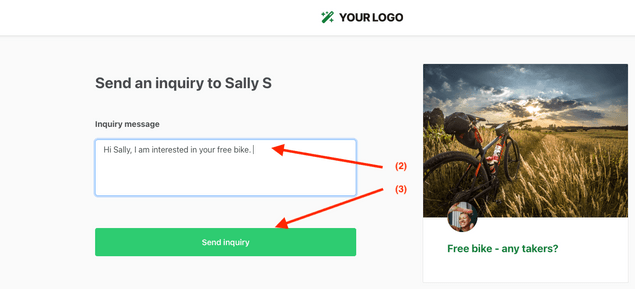
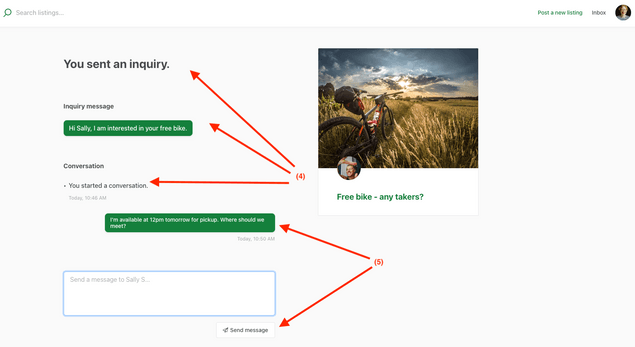
Buyers initiate transactions from the listing page. Pressing the call to action button takes them to a detail page with the listing and message input field (1). The message field cannot be left blank, buyers must write something there (2). The inquiry is finalized and sent to the seller by pressing the call to action again (3). After sending the inquiry, they are transferred to the order details page where the inquiry message is shown alongside the listing and transaction timeline (4). Buyers have the option to write more message (5).
The initial inquiry message triggers a notification to the seller that they received a new inquiry on your marketplace. Subsequent messages from the buyer trigger a notification to the seller that they received a new message.
You can see screenshots of the process below.
2. Reacting to inquiries as a seller
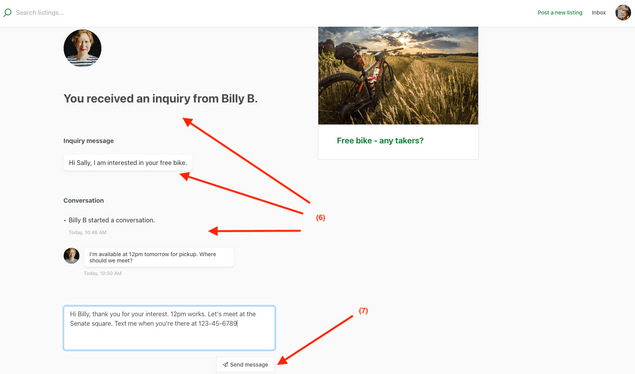
Sellers are notified by email when a new inquiry is created on their listing. They can find the the inquiry in their Inbox. A seller's order details page includes information about the inquired listing, the inquiry message and any subsequent messages from the customer, and a timeline of the transaction (6). Sellers can write back to the message (7).
Each new message triggers an email notification to the buyer that they received a new message in your marketplace.
Operator actions
There are no actions for an operator to take during this transaction. Operators can view the transaction and messages exchanged during it in Manage->Transactions in Console.
