Last updated
How to go Live and launch your marketplace
Six steps to go Live and launch your marketplace!
Table of Contents
- 1. Subscription
- 2. Share information for setup with Sharetribe
- Custom domain
- Stripe Publishable key
- Map provider public key
- 3. Configure your custom domain
- Configure your subdomain DNS record: For www or any other subdomain.
- Configure your root domain record
- 4. Sharetribe confirms your Live environment
- 5. Configure payments
- 6. Configure outgoing email address
- Add sender name and address
- Configure email DNS
- Validate email DNS
Once you are ready to bring the first users to your marketplace, you are ready to go Live. Going Live unlocks the Live environment, where it is possible to add real users and process transactions with real credit card details.
Going Live takes several steps.
- Subscription
- Sharing information with Sharetribe about your custom domain, payments, analytics, and map provider
- Configuring your custom domain
- Sharetribe confirming your Live environment
- Configure payments
- Configure outgoing email address
This guide details how to complete each step.
1. Subscription
Go Live by subscribing to a paid plan. You can review different plans and features available on the marketing site.
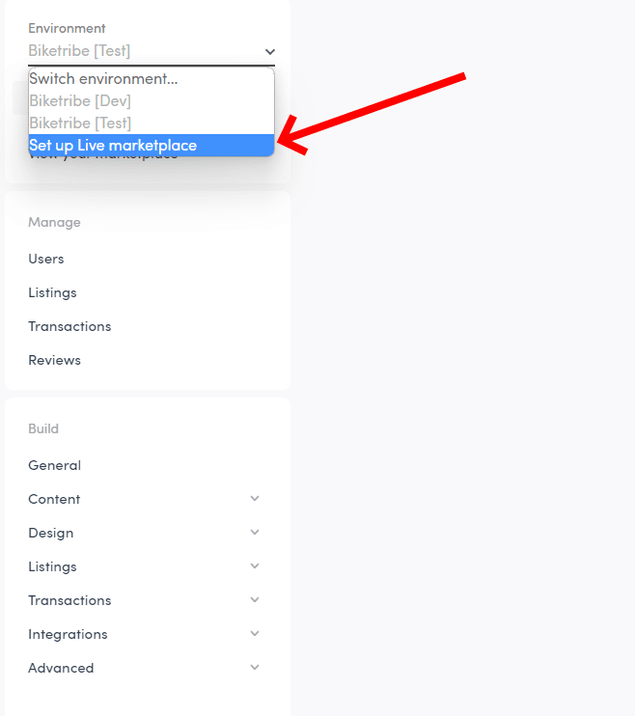
To subscribe, go to your Console. Click the environment dropdown in the top left of the sidebar navigation and select “Set up Live marketplace”. Fill in your billing information and submit.
2. Share information for setup with Sharetribe
After subscribing you will receive a confirmation email with your invoice and billing information. The email also includes a link to this form that you should use to share information for setup with Sharetribe. If the form is not working for you for some reason, please email us the following information at hello@sharetribe.com.
Here is a list of the information that will be collected from you during the setup process:
Custom domain
Your Live marketplace will be accessible at a custom domain of your choice. You must purchase, host, and configure your DNS settings with a hosting provider in order to use a custom domain. You can use any hosting provider, such as GoDaddy, Google Domains, or Hover.
During the setup process, please share with us your custom domain name. You should also start configuring your DNS records with your hosting provider. so that when we receive the information everything is ready for us to set up your live environment.
Sharetribe provides a dedicated SSL certificate for your marketplace address when your domain is connected to your marketplace.
Stripe Publishable key
A marketplace-specific payment system called Stripe Connect powers payments on your marketplace. Stripe Connect requires several setup steps. Please consult our guide for help setting up your Stripe Connect.
After setup, you can find your Publishable key in Stripe->Developers->API keys. Share with us this key, which will look something like pk_live_somelongrandomvaluelikeVqFze9etc.
You will configure your Secret key after Sharetribe confirms your Live environment.
Map provider public key
You need to select a map provider to power geolocation functionalities on your marketplace, such as a location-based search for listings. Even if customers use keywords to search, a map provider is necessary to let your sellers input a pickup location if they want.
You can choose either Mapbox or Google Maps as a map provider. If you are not sure where to start, we recommend Mapbox due to their generous free tier.
Mapbox
Sign up to Mapbox and go to
the account page. Then copy the
Default public token.
If you wish to create a new one, click + Create a token,
give it a name and make sure all Public scopes are selected. Create the
token and copy its value.
Google Maps
Go to the Google Maps JavaScript API V3 Reference, and click on the "Get started" button in the top bar, and follow the instructions to generate your key. Share this key with Sharetribe.
Next, you must enable certain capabilities within Google Maps.Follow the instructions in the Getting started section of the Places library documentation to enable using the required services. You should enable: Google Places API Web Service ("Places API"), Maps Static API, and Maps JavaScript API.
3. Configure your custom domain
To connect your custom domain to your marketplace, you must configure DNS records in your domain provider/hosting dashboard. You can host your marketplace in any domain or subdomain as long as you own the domain. Sharetribe strongly recommends hosting your marketplace in a www (or other) subdomain and having your root (main) domain, if needed, as a redirect. The Sharetribe team can set one redirect for you. This would normally be from the root domain to your www subdomain.
Information
Configure your subdomain DNS record: For www or any other subdomain.
Your subdomain records can be set to make your marketplace accessible at
any subdomain, the default option is "www", but there are other options
possible like "listings", or "marketplace", or "shop".
www.myexampledomain.com or www.sharetribe.com or
marketplace-academy.sharetribe.com are examples of subdomains. If you
are planning to also use your root domain for your marketplace, www
should be your main subdomain.
- Look over the existing CNAME records.
- If a CNAME record exists where "Host" or "Source" or "Name" is set to
"www" or your desired subdomain, click edit and set "Points To" or
"Value" or "Target" to
proxy.mysharetribe.com.- Note that depending on the DNS provider you may need to add a
period at the end:
proxy.mysharetribe.com. - Note that the target address for this record, proxy.mysharetribe.com, should be copied as-is. You don't need to change it to your own marketplace's address.
- Note that depending on the DNS provider you may need to add a
period at the end:
- If a CNAME record doesn't exist, click "Add record" or "Create
record".
- From the record type list, select CNAME.
- Fill in the "Host" or "Source" to any subdomain you want to use, like "www" or "listings" or "marketplace" or "your-own-subdomain".
- Set or fill the "Points To" or "Value" or "Target" field to
proxy.mysharetribe.com. - If you have to fill a field named "TTL", set it to "3600".
- Note that some domain providers use the entire subdomain address
for the setup, instead of only the subdomain part, so instead of
adding just
wwwas the "Host" or "Source", you would need to addwww.myexampledomain.com - Note that the target address for this record,
proxy.mysharetribe.com, should be copied exactly as-is.
- Save changes.
- Check that the record has been updated or created according to your changes.
Configure your root domain record
Your root domain is your base domain without “www”.
myexampledomain.com and sharetribe.com are examples of root domains.
The root domain should redirect to your main marketplace domain if you
are using a www subdomain. You normally don't need to set the root
domain DNS record if you are not planning to use "www" as your main
(sub)domain, sou can ignore this instructions if you are going to use a
subdomain other than "www".
- Look over any existing A records
- If an A record exists for your root domain, you need to modify the
address and point it to Sharetribe's IP address instead:
34.248.140.98- In many domain providers your root domain is set via the
@sign, if you have any A type record with a "Host" or "Source" or "Name" set to@, edit the record and set "Points To" or "Value" or "Target" to34.248.140.98 - Some domain providers, use the entire domain instead of just the
@sign. In those providers, you should look for and modifyt an A type record with your entire domain (and without any subdomain attached to it). For examplemyexampledomain.com.
- In many domain providers your root domain is set via the
- If an A record doesn't exist, click "Add record" or "Create record".
- From the record type list, select A.
- For most domain providers in order to create a record, you need to
set the "Host" or "Source" or "Name" to
@.- Set the "Points To" or "Value" or "Target" to
34.248.140.98
- Set the "Points To" or "Value" or "Target" to
- If you have to fill a field named "TTL", set it to "3600".
- Note that in some domain providers, instead of setting the record
via the
@sign, you need to write the entire domain.
- Save changes.
- Check that the record has been updated or created according to your changes.
Information
4. Sharetribe confirms your Live environment
After submitting your details, Sharetribe will set up your Live environment. Sharetribe typically turns around your marketplace in 24 hours during business days, often less. Follow instructions carefully to prevent any delays during setup.
5. Configure payments
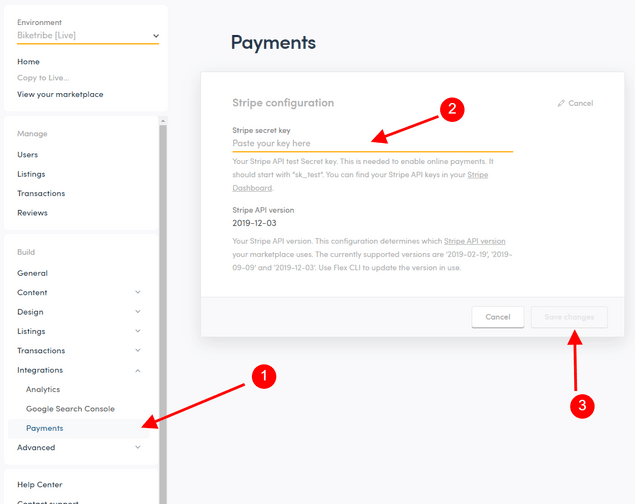
Navigate to your new Live environment using the environment drop down menu. Then, add your Stripe live key to your Flex Console. Find this key where you got your public key or follow our instructions for more information. It should look like sk_live_somelongrandomvaluelike0Rx3jvetc
Paste your live key in "Integrations -> Payments" and save changes.
6. Configure outgoing email address
The final step is configuring your outgoing email settings. This setup will ensure your emails are branded with your marketplace name and sender address as well as help ensure reliable email delivery.
Navigate to Console->Build->General to complete this setup.
Add sender name and address
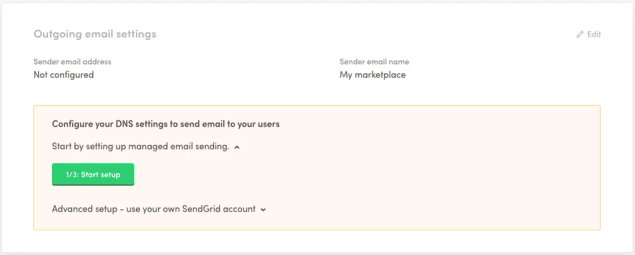
Under “Outgoing email settings”, click on the "1/3 Start setup" button to start the setup. Follow the instructions in the UI.
When you have added your sender email information, you will be prompted with DNS information.
Configure email DNS
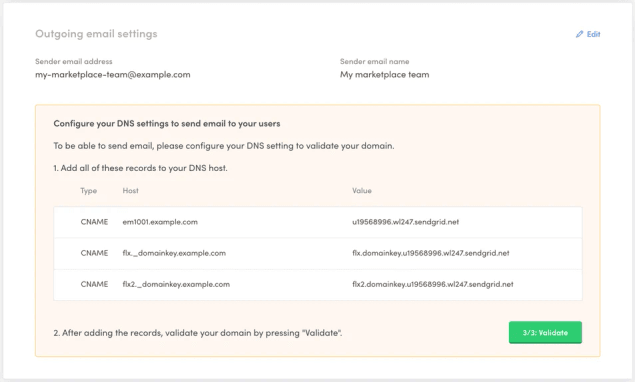
Next, you need to add the generated records from your Console to your DNS hosting. This is an important step for your sender reputation and your email deliverability. You should add all the records in the table visible in Console.
These DNS provider video tutorials by SendGrid might be useful if you are not sure how to configure the DNS records for your specific DNS provider.
Validate email DNS
When you have configured your email DNS records, you still need to validate the records for your emails to work. You can do that by clicking on the "3/3 Validate" button in Console. If everything is set up correctly, you should see a success message in Console.
Whenever you change your DNS records, you can revalidate to check that everything is set up correctly.
Voila! You’re Live and fully functional!


